Troubleshooting the GINA login agent installation

The following errors may arise during the installation of the GINA login agent, follow the solutions provided to resolve them:

  1. 'Remcom.exe' is not recognized as an internal or external command, operable program or batch file.

    This error occurs if the Remcom.exe file, which is used to install the login agent in remote machines, has been flagged and deleted by the antivirus software. To resolve this issue:

    • Check if the Remcom.exe file exists in the bin folder of ADSelfService Plus Installation directory (C:\Program Files\ManageEngine\ADSelfService Plus\bin).
    • If not, check if your antivirus software has removed the file. Configure your antivirus software to trust the Remcom.exe file.
  2. Could not Install Client Software

    This error occurs because of a network timeout while installing the client software. Make sure the network connection is re-established and try to install the software again.

  3. Initiating Connection to Remote Service Failed

    This error could occur if the target computer could not be contacted. To prevent this:

    • Ensure if such a computer really exists. If so, ensure whether it is connected to the network.
    • To check for connectivity, ping this computer from the server where ADSelfService Plus is installed.
    • Make sure Remote Registry service is running in the client machine.
  4. Couldn't connect to the machine, ADMIN$.Access is denied

    This error may occur because admin share has not been enabled in the client computer. To resolve this issue:

    • Configure Domain Settings (when run as console) or the Logon Tab (when run as service) with a different user account that has Domain Admin privileges.
    • Enable admin share:
      • In the client computer, go to Start > Run and type gpedit.msc and hit Enter.
      • Expand the Administrative Templates > Network > Network Connections > Windows Firewall.
      • Click Domain Profile and double click Windows Firewall: Allow inbound remote administration exception.
      • Select Enabled and click OK.
  5. Logon Failure: The target account name is incorrect.

    This error message can occur if two computers have the same computer name. One computer is located in the child domain; the other computer is located in the parent domain.

  6. Logon failure: unknown user name or bad password.

    This error message occurs when admin share might not be enabled in the client computer. To resolve this issue:

    • Configure Domain Settings (when run as console) or the Logon Tab (when run as service) with a different user account that has Domain Admin privileges.
    • Enable admin share:
      • In the client computer, go to Start > Run and type gpedit.msc and hit Enter.
      • Expand the Administrative Templates > Network > Network Connections > Windows Firewall.
      • Click Domain Profile and double click Windows Firewall: Allow inbound remote administration exception.
      • Select Enabled and click OK.
  7. Couldn't Start Remote Service. Overlapped I/O operation is in progress.

    The Remote service couldn't be started either because the copy was blocked by antivirus or because the service couldn't be started automatically. To prevent this:

    • In the client machine, go to the Services tab and check whether the Remote Registry and Server services have started. If not, enable these services.
  8. Another version of this product is already installed.

    This error occurs when another version of this login agent is already installed in the remote machine. To prevent this, uninstall the existing client software from this machine.

  9. Another installation is already in progress.

    This error occurs when another installation is already in progress. To prevent this, try to install the client software after a few minutes.

  10. Could not connect to the machine.

    This error could occur if the target computer could not be contacted. To prevent this:

    • Ensure if such a computer really exists.
    • If so, ensure it is connected to the network.
    • To check for connectivity, ping this computer only from the server where ADSelfService Plus is installed.
  11. Network path not found/Invalid Credential.

    This error could occur if the target computer could not be contacted. To prevent this:

    • Configure Domain Settings (when run as console) or the Logon Tab (when run as service) with a different user account that has Domain Admin privileges.
    • Enable admin share:
      • In the client computer, go to Start > Run and type gpedit.msc and hit Enter.
      • Expand the Administrative Templates > Network > Network Connections > Windows Firewall.
      • Click Domain Profile and double click Windows Firewall: Allow inbound remote administration exception.
      • Select Enabled and click OK.
  12. Couldn't copy ADSelfServicePlusClientSoftware.msi

    This error occurs because the ADSelfService Plus server has insufficient privileges to access the client machine. To prevent this:

    • Configure Domain Settings (when run as console) or the Logon Tab (when run as service) with a different user account that has Domain Admin privileges.
    • Enable admin share:
      • In the client computer, go to Start > Run and type gpedit.msc and hit Enter.
      • Expand the Administrative Templates > Network > Network Connections > Windows Firewall.
      • Click Domain Profile and double click Windows Firewall: Allow inbound remote administration exception.
      • Select Enabled and click OK.
  13. Multiple connections to a server or shared resource by the same user.

    This error occurs when other applications or processes are using the same user account used by ADSelfService Plus to try and connect to the remote machine in which the login agent is to be installed. To resolve this issue:

    • Disconnect all previous connections to the server or shared resource and try again.
    • Configure Domain Settings (when run as console) or the Logon Tab (when run as service) with a different user account that has Domain Admin privileges.
  14. Error in security-core.js. The user will encounter a pop-up that displays the script error message.

    Probable causes:

    • Cookies are not enabled in Internet Explorer for the system account.
    • The ADSelfService Plus product URL is not added as a trusted site in Internet Explorer.

    Solution:

    • Follow the steps here to enable cookies.
    • Follow the steps here to add the ADSelfService Plus product URL to the list of trusted sites in Internet Explorer.
  15. A blank screen appears when the user tries to authenticate using Windows MFA or perform a self-service action such as password reset or account unlock.

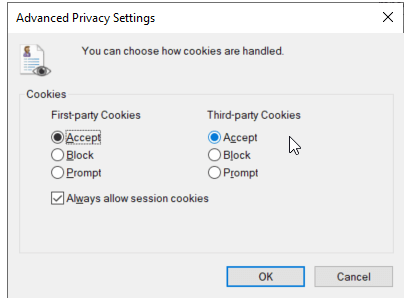
    Probable cause: Cookies are not enabled in Internet Explorer on the user's system.

    Solution: Follow the steps here to enable cookies in Internet Explorer.

  16. A blank screen appears during the endpoint MFA process.

    Probable cause: The ADSelfService Plus product URL is not added as a trusted site in Internet Explorer.

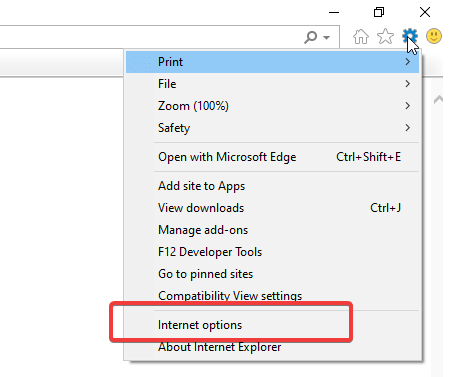
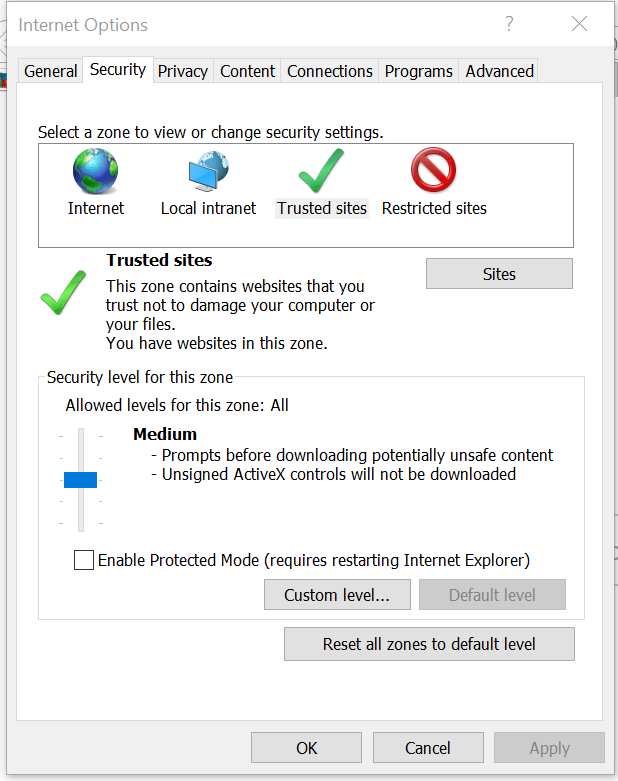
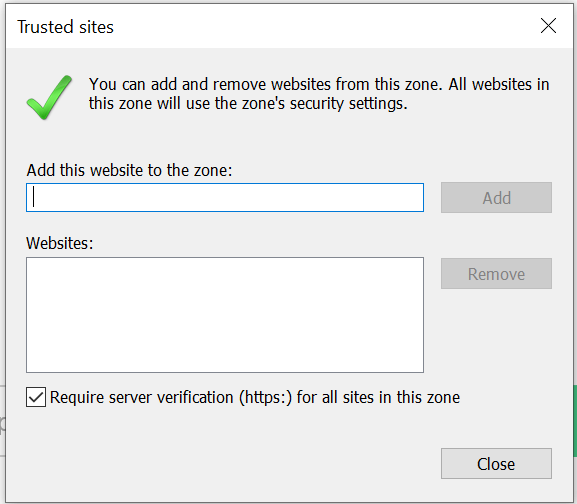
    Solution: Follow the steps here to add the ADSelfService Plus URL to the list of trusted sites in Internet Explorer.

  17. When a user tries to log in to their machine, there is a delay in the loading of the GINA component.

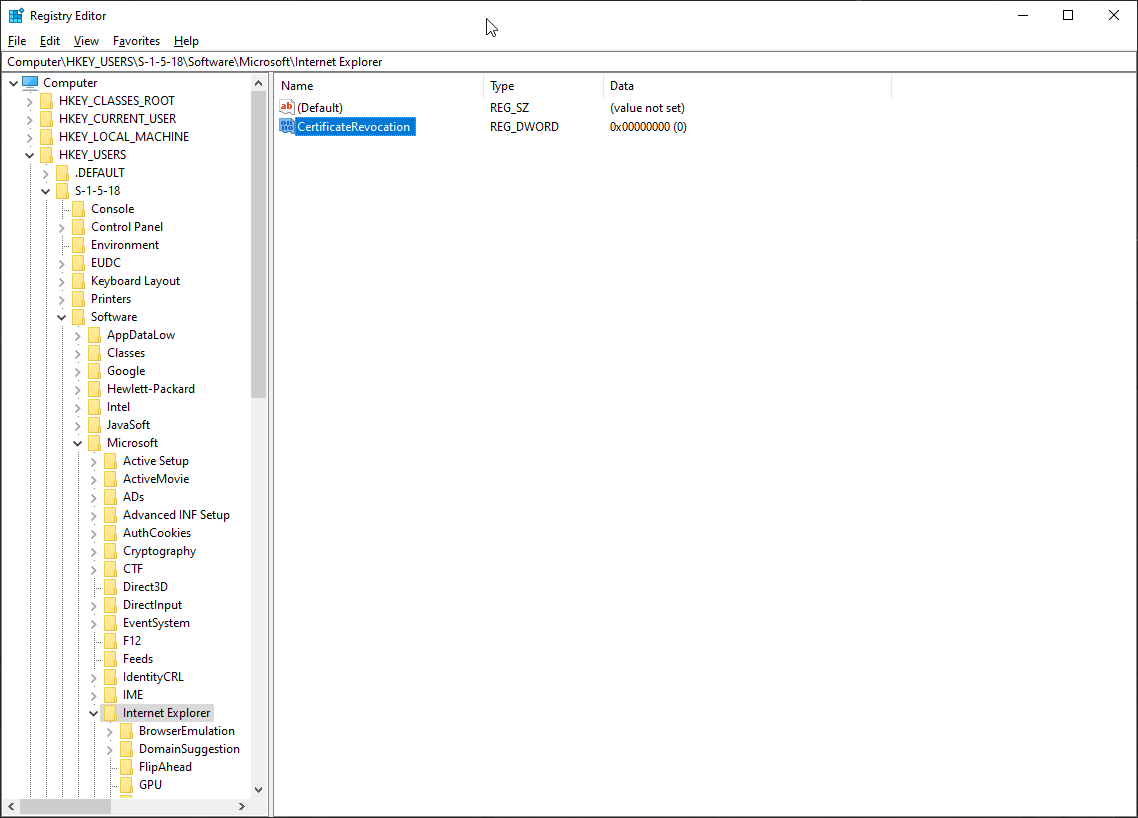
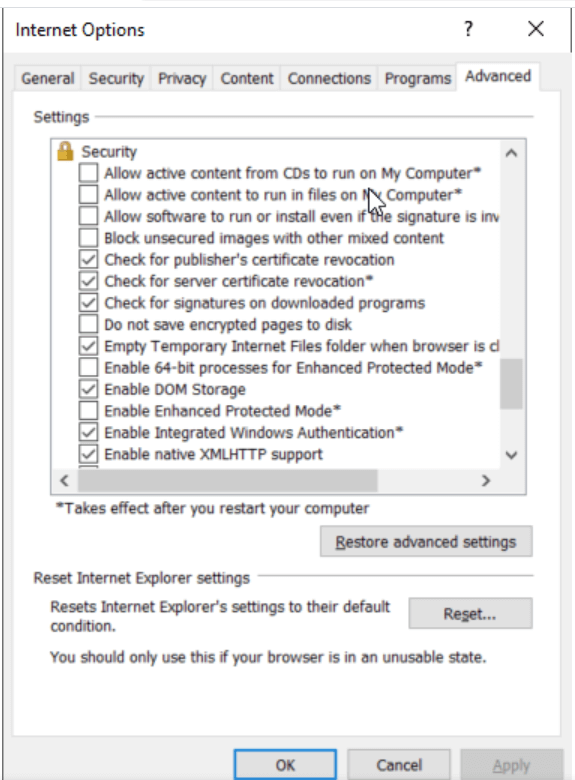
    Probable cause: The user is using a self-signed certificate.

    Solution: Disable certification revocation, or the act of invalidating a TLS/SSL certificate before its scheduled expiration date. There are two ways to do this.

    Method 1: Adding registry values

    • Open the Run dialog box by pressing Windows + R on the machine where you have the GINA loading issue.
    • Type regedit in the Run dialog box and open the Registry Editor.
    • Navigate to Computer\HKEY_USERS\S-1-5-18\Software\Microsoft\Windows\CurrentVersion\Internet Settings.
    • Right-click Internet Settings and select New → DWORD.
    • Enter the registry value name as CertificateRevocation. Right-click this new registry value and select Modify. In the Edit Dword Value dialog box that appears, enter the value data as 0.

    Adding registry value

    Method 2: Changing settings in Internet Explorer

    • Download PsTools on the machine facing the issue.
    • Press Windows + R to open the Run dialog box, and type cmd to open the Command Prompt.
    • Type in the command psexec.exe -s -i "C:\Program Files (x86)\Internet Explorer\iexplore.exe.".
    • The browser will open. Now go to Settings and select Internet options.
    • Changing settings in Internet Explorer

    • In the Internet Options window, go to the Advanced tab and scroll down to the Security group in the list of Settings.
    • Uncheck the checkboxes next to Check for publisher's certificate revocation and Check for server certificate revocation.
    • Changing settings in Internet Explorer

    • Click OK to close the window.
  18. Solution: Enabling cookies in Internet Explorer on the user's system

    Verify if cookies are enabled in Internet Explorer on the user's system. If they’re not, enable cookies by following the steps below:

    1. Download PsTools on the machine facing the issue.
    2. Open the Command Prompt and run the command psexec.exe -s -i "C:\Program Files (x86)\Internet Explorer\iexplore.exe.".
    3. Internet Explorer will open. (Note: Internet Explorer is the only browser that opens for GINA-related errors in Windows, irrespective of other browsers installed on the user's system.)
    4. Go to Settings and select Internet options.
    5. Enabling cookies in Internet Explorer

    6. In the Internet Options window, go to the Privacy tab. Under Settings, select the Advanced button.
    7. In the Advanced Privacy Settings window, select the Accept radio button under both First-party Cookies and Third-party Cookies.
    8. Enabling cookies in Internet Explorer

    9. Select OK and close the Advanced Privacy Settings window.
    10. Click Sites under Settings in the Internet Options window.
    11. In the Per Site Privacy Actions window that opens, enter the ADSelfService Plus product URL in the Address of website field and click Allow.
    12. Enabling cookies in Internet Explorer

    13. Press OK to close the Per Site Privacy Actions and Internet Options windows.

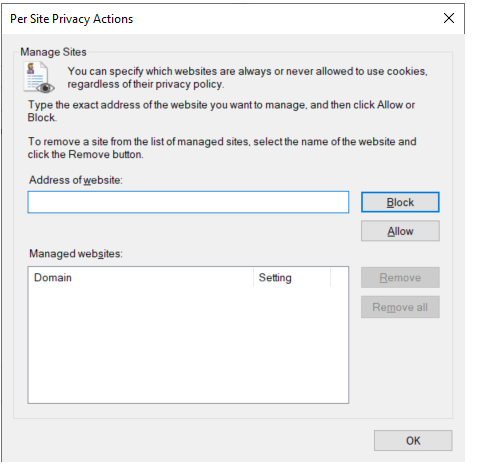
    Solution: Adding the ADSelfService Plus URL to intranet/trusted sites

    1. Download PsTools on the machine facing the issue.
    2. Open the Command Prompt and run the command psexec.exe -s -i "C:\Program Files (x86)\Internet Explorer\iexplore.exe.".
    3. The browser will open. Now go to Settings and select Internet options.
    4. Enabling cookies in Internet Explorer

    5. In the Internet Options window, go to the Security tab and select Trusted sites in the Select a zone to view or change security settings field.
    6. Enabling cookies in Internet Explorer

    7. Click Sites below the Select a zone to view or change security settings field to open the Trusted sites window.
    8. Enabling cookies in Internet Explorer

    9. In the Trusted sites window, type in the URL of the ADSelfService Plus application in the Add this website to the zone field, then click Add.
    10. These steps should ensure that there are no further GINA loading issues.

  19. When I try to install the login agent from the ADSelfService Plus console, I get the following error: "Couldn't copy PAExec to the machine."

    Cause: User account does not have sufficient privilege over the object.

    Solution:

    • Log in to ADSelfService Plus with the admin credentials.
    • Click on the Domain Settings found at the right-top corner of the webpage.
    • Under the Actions section, click on the Edit Domain Details button.
    • Select Authentication, and provide the Domain Username and Domain Password of an account that has domain admin privileges.
    • Click Save.
  20. When I try to install the login agent from the ADSelfService Plus console on to a remote server, I get the following error: "PAExec service could not be installed/started on remote server."

    Cause: PAExec is being blocked by the firewall or antivirus software.

    Solution: Change your antivirus and firewall settings to allow the PAExec service.

    When I try to install the login agent from the ADSelfService Plus console, I get the following error: "Object not found" or "0x80041002 (WBEM_E_NOT_FOUND)."

    Cause: The WMI repository may be corrupted.

    Solution: To resolve the corruption of WMI repository, follow the steps in this link.

    Work around:

    1. Log in to the Windows Server machine using an administrator account.
    2. Open Group Policy Management Console (GPMC) and right-click on the default domain policy within your domain.
    3. In the Group Policy Management Editor window that opens, go to Computer Configuration → Policies → Administrative Templates: Policy definitions (ADMX files) retrieved from the local computer → System → Group Policy. On the right pane, select Turn off Resultant Set of Policy logging.
    4. Enable the Turn off Resultant Set of Policy logging to disable the Resultant Set of Policy (RSoP).
  21. When I try to install the login agent from ADSelfService Plus console, I get the following error: "Access denied by DCOM Security. The user does not have remote access to the computer through DCOM."

    Cause 1: The login name or password provided for scanning is invalid in the workstation.

    Solution: Check if the login name and password are entered correctly.

    Cause 2: The user does not have remote access to the computer through the Distributed Component Object Model (DCOM).

    Solution:

    1. Log in to your system with admin credentials.
    2. Go to Control Panel → Administrative Tools → Component Services, or type in DCOMCnfg.exe from the search bar, and click Enter to open the Component Services dialog box.
    3. Expand Component Services in the Component Services dialog box. Then expand Computers, and right-click on My Computer. Click Properties.
    4. Go to the COM Security tab in the My Computer Properties dialog box.
    5. Select Edit Limits under Launch and Activation Permissions.
    6. In the Launch and Activation Permission dialog box that opens, if your name or the group that you belong to does not appear in the groups or usernames list, click Add.
    7. In the Select Users, Computers, or Groups dialog box that pops up, add your name and the group in the Enter the object names to select field. Click OK.
    8. In the Launch and Activation Permission dialog box, select your user and group in the Group or user names box. Under the Permissions for user field, in the Allow column, select Remote Launch and Remote Activation. Click OK.

    The user should now have remote access to the computer through DCOM.

    Cause 3: DCOM may not be configured to allow a WMI connection.

    Solution: If the DCOM in the machine is not configured to allow a WMI connection, then follow the below steps in the machine that needs to accept WMI connection.

    1. Log in to your system with admin credentials.
    2. Go to Control Panel → Administrative Tools → Component Services, or type in DCOMCnfg.exe from the search bar to open the Component Services dialog box.
    3. Expand Component Services in the Component Services dialog box. Then expand Computers, and right-click My Computer. Click Properties.
    4. Click the COM Security tab in the My Computer Properties dialog box.
    5. Click Edit Limits, under the Access Permissions section.
    6. The Access Permissions dialog box pops up. Under the Group or user names section, select Anonymous Logon. In the Permissions for user section, select Remote Access. Click OK.

    Cause 4: The Remote DCOM option is disabled in the remote workstation.

    Solution: Check if Remote DCOM is enabled in the remote workstation. If not, follow the steps below to enable it:

    1. Select Start > Run.
    2. Type DCOMCnfg.exe in the text box, and click OK.
    3. Click on Component Services > Computers > My Computer.
    4. Right-click and select Properties.
    5. Select the Default Properties tab.
    6. Check the box next to Enable Distributed COM in this machine.
    7. Click OK.

    Cause 5: The user account is invalid in the target machine.

    Solution: Check if the user account is valid in the target machine by opening Command Prompt, and execute the following commands:

    net use \<RemoteComputerName>C$ /u:<DomainNameUserName> "<password>"

    net use \<RemoteComputerName>ADMIN$ /u:<DomainNameUserName> "<password>"

    If these commands show any errors, the provided user account is not valid on the target machine.

    Cause 6: The user name provided for scanning does not have sufficient access privileges to perform the scanning operation. This user may not belong to the administrator group for this device machine.

    Solution: Move the user to the Administrator Group of the workstation or scan the machine using an administrator (preferably a domain administrator) account.

    Solution: Move the user to the Administrator Group of the workstation or scan the machine using an administrator (preferably a domain administrator) account.

    Cause 7:A firewall is configured on the remote computer. Such exceptions mostly occur in Windows XP (SP 2) when the default Windows firewall is enabled.

    Solution: Disable the default Firewall in the Windows XP machine:

    1. Select Start → Run
    2. Type Firewall.cpl and click OK
    3. In the General tab, click Off
    4. Click OK

    If the firewall cannot be disabled, launch Remote Administration for administrators on the remote machine by executing the following command in Command Prompt:

    netsh firewall set service RemoteAdmin

    After scanning, you can disable Remote Administration using the following command:

    netsh firewall set service RemoteAdmin disable

    Cause 8: WMI is not available in the remote Windows workstation. This happens in Windows NT. Such error codes might also occur in higher versions of Windows if the WMI components are not registered properly.

    Solution: Install WMI in the remote workstation. Refer to these steps for help.

    If the WMI Components are not registered, register the WMI DLL files by executing the following command in the command prompt: winmgmt /RegServer

    Cause 9: There is some internal execution failure in the WMI service (winmgmt.exe) running in the device machine. The last update of the WMI Repository in that workstation could have failed.

    Solution:

    Restart the WMI service in the remote workstation:

    1. Select Start → Run
    2. Type Services.msc and click OK
    3. In the Services window that opens, select Windows Management Instrumentation service.
    4. Right-click and select Restart
  22. When I try to install the login agent from ADSelfService Plus console, I get the following error: "Remote Procedure Call server is unavailable."

    Cause: The Remote Procedure Call (RPC) port of the machine is blocked by the firewall.

    Solution: Change the setting in your firewall to allow RPC ports.

  23. When I try to install the login agent from ADSelfService Plus console, I get the following error with code 80041010 in Windows Server 2003, "Fatal error occurred."

    Cause: The Win32_Product class is not installed in Windows 2003 Server by default.

    Solution: To add the Win32_Product class, follow the steps below:

    1. In Add or Remove Programs, select Add/Remove Windows Components.
    2. In the Windows Components Wizard, select Management and Monitoring Tools, then click Details.
    3. In the Management and Monitoring Tools dialog box, select WMI Windows Installer Provider and click OK.
    4. Click Next.
  24. Why is offline multi-factor authentication (offline MFA) not prompted for the user even when the feature is configured and the latest version of the GINA login agent is installed in the user machine?

    The multiple reasons for this issue are listed below along with the solution:

    • Probable cause 1: The user doesn't belong to the self-service policy with offline MFA enabled.

      Solution: Make sure offline MFA has been enabled for the self-service policy the users belongs to. If the user belongs to multiple self-service policies, make sure the self-service policy with offline MFA enabled has the highest priority.

    • Probable cause 2: The user has not enrolled their machine for offline MFA.

      Solution: Ensure the user has enrolled their machine for offline MFA. Enrollment could even be enforced by enabling the Force user to enroll their device for offline MFA after successful online authentication setting for the self-service policy the user belongs to. The user and their enrolled machine will be listed in the Offline MFA Enrollment Report if successfully enrolled.

    • Probable cause 3: MFA is not enabled for the scenarios that have to be secured by offline MFA.

      Solution: Follow these steps to enable Machine-based MFA for logins and peripheral actions such as User Account Control (UAC) prompts, system unlocks, and RDP server-side authentication using these steps. After enabling MFA, run the customization scheduler to update these changes across all the user machines.

    Reach out to our support team if this issue persists even after implementing this solution.

  25. Why is the time-based one-time-passcode (TOTP) generated during offline MFA by Google Authenticator, Microsoft Authenticator, Zoho OneAuth TOTP, or a custom TOTP authenticator marked invalid?

    Probable cause: The OTP generated during the offline MFA process by the software or hardware TOTP authenticator is rendered invalid if the user machine and the mobile device generating the OTP don't have their times in sync.

    Solution: Ensure the mobile device and the machine follow the correct time.

  26. Why is the user prevented from logging in to their machine or performing peripheral actions like UAC authentication when not connected to ADSelfService Plus?
    • Probable cause 1: MFA is enforced for the specific machine, but the user is neither connected to ADSelfService Plus, nor is their machine enrolled for Offline MFA, and so they're denied access since they cannot perform MFA.

      Solution: Check the values of the Manage MFA drop-down (Configuration > Administrative Tools > GINA/Mac/Linux (Ctrl+Alt+Del) > GINA/Mac/Linux Installation > Installed Machines). If this setting is set to Enforce, access will be denied regardless of other settings. Settings can be configured to require the user to complete online MFA, as well as to encourage or require enrollment of their machine for offline MFA.

    • Probable cause 2: MFA is not configured to be bypassed when the ADSelfService Plus server is unreachable, and the user is not enrolled for offline MFA, and so they're denied access because MFA cannot be completed.

      Solution: Check the value of the Skip MFA when the ADSelfService Plus server is down or unreachable setting (Configuration > Self-Service > Multi-Factor Authentication > Advanced Settings > Endpoint MFA > Machines Login MFA() If this setting is not enabled, access will be denied. Settings can be configured to require the user to complete online MFA, as well as to encourage or require enrollment of their machine for offline MFA.

    To change the outcome according to your requirements, set the value of these settings appropriately and run the customization scheduler to update the changes across all user machines. The scheduler will reflect changes only on login agents installed via the admin portal, or have remote registry services enabled.

    Reach out to our support team if this issue persists even after implementing this solution.

  27. Why is the user able to perform offline MFA even after they have disenrolled their machine, or the admin has disenrolled it via the Offline MFA Enrollment Report?

    Probable cause: The user is able to perform offline MFA until the disenrollment data is updated on the specific machine.

    Solution: The disenrollment data will be updated during the next successful online MFA by any user in the specific machine.

  28. Why does the user have to perform online MFA sometimes even after trusting their device or browser?

    Probable causes:

    • The Restrict users from performing offline MFA after _ days setting is enabled and the user has reached depleted their limit. To ensure the limit is reset and the user can perform offline MFA again, online MFA is initiated.
    • The Force user to enroll their device for offline MFA after successful online authentication setting is enabled. To ensure that users complete authentication and are enrolled for offline MFA, the online MFA process is initiated once after offline MFA is enabled and is user is enforced to enroll for it.
  29. Why is the display language set in the ADSelfService Plus portal not reflected during Offline MFA?

    Probable cause: The display language set via the ADSelfService Plus portal is extended only to UI elements run by the server, and so only some parts of the login agent are dependent on this setting. The other parts, including features like offline MFA and Password Policy Enforcer are dependent on the welcome screen display language settings (Start > Settings > Time & Language > Administrative language settings > Welcome screen and new user accounts > Copy settings > Welcome screen display language).

    Solution: Learn how to customize the display language for the offline MFA feature here.

  30. Users attempting MFA for Windows logins, in some instances, were redirected back to the login screen inspite of successful MFA completion.

    Cause: The built-in Windows login screen timeout period for authentication is shorter than the time required to complete MFA.

    Solution: The Windows login screen timeout period can be changed in the registry settings. The default timing upon installation of login agent version 6.7 and above is 3,00,000 ms (5 min). If the timeout period is already set in the registry, installing the login agent won't modify the existing value. The admin can change the value manually using these steps:

    1. Go to the registry path HKEY_LOCAL_MACHINE\SOFTWARE\Microsoft\Windows\CurrentVersion\Authentication\LogonUI.
    2. Right click LogonUI and select DWORD.
    3. Name it IdleTimeOut. Double click it and change the Value Data to Decimal and specify the IdleTimeOut in milliseconds.
    4. Click OK.
  31. Questions

Go to Top

Copyright © 2024, ZOHO Corp. All Rights Reserved.